Ever wonder why your microcurrent routine might feel like a waste of time and money? The secret isn’t just the device itself — it’s the order in which you layer your skincare. Microcurrent works by sending low-level electrical impulses to your facial muscles, and the conductivity of each product you apply directly affects how much energy reaches its target. Get the sequence wrong, and you block results or leave your skin undernourished at the moment it’s most receptive. This guide breaks down the exact pre-treatment, treatment, and post-treatment steps to maximize effectiveness, avoid ingredient conflicts, and ensure every session truly lifts, tones, and rejuvenates.
Why Skincare Product Order Matters More Than the Beauty Device Itself?
A clinical microcurrent device operating at 200–500 µA can meaningfully stimulate the zygomaticus major, frontalis, and orbicularis oculi muscles — the muscles responsible for cheek lift, brow elevation, and eye-area firmness. But that stimulus only reaches the muscle layer if the conductivity pathway from the device probe to the dermis is intact. A single layer of a silicone-based primer or a facial oil containing oleic acid can reduce current transmission by up to 80%, effectively turning a $300 device into a facial massager.
The reason most people do not see results from their microcurrent devices within the first 4–6 weeks is almost never device failure — it is protocol failure. What I have consistently seen, working with clients across both professional and at-home device categories, is that the wrong product order accounts for the majority of “it didn’t work for me” outcomes. The fix is almost always the same: rethink the layering sequence with conductivity, skin barrier integrity, and ingredient timing in mind.
The Three-Phase Framework
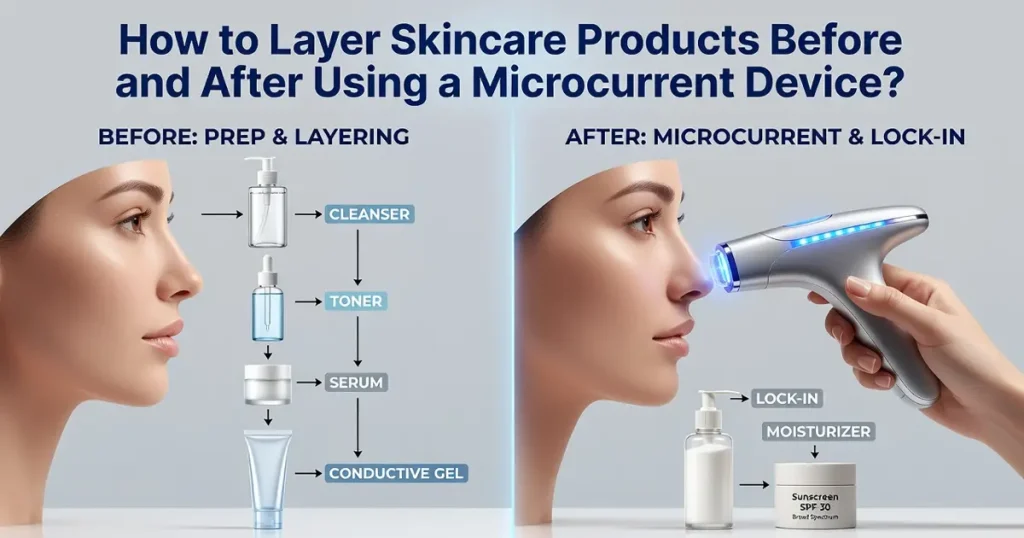
Think of a microcurrent session as having three distinct phases, each with its own product logic:
Phase 3 — Post-Treatment (Recovery): Leverage increased permeability, seal the barrier
Phase 1 — How to Prepare Your Skin Before the Microcurrent Device?
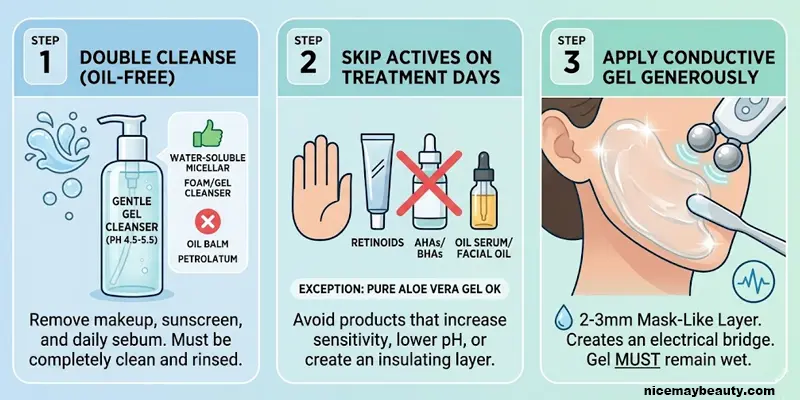
Step 1: Double Cleanse with an Oil-Free Formula
Begin with a gentle, oil-free gel or foam cleanser with a pH between 4.5 and 5.5 — close to the skin’s natural acid mantle. Avoid cleansing balms, cleansing oils, or micellar waters that leave a residual lipid film; even trace amounts of mineral oil or petrolatum will increase surface impedance and weaken current delivery. If you wear heavy sunscreen or makeup, a first cleanse with a water-soluble micellar water (fully rinsed off) is acceptable before your main cleanse.
A common mistake I see too often is skipping the cleanse before an evening session because the face “feels clean.” Sebum production continues throughout the day. Without removing it, you are treating through a layer of fatty acids — and fatty acids are the exact molecular structure that interrupts electrical conductivity. For more on this, see Should Beauty Devices Be Used Before or After Skincare Products? for a full breakdown of device placement in the routine.
Step 2: Skip Actives on Treatment Days
Before your microcurrent session, avoid the following categories of products entirely — not just in the immediately prior step, but for the entire morning or evening before the session:
Retinoids (retinol, retinal, tretinoin): Increase skin sensitivity and cell turnover rate; combining with microcurrent can cause erythema and micro-barrier disruption
AHAs (glycolic acid, lactic acid) and BHAs (salicylic acid): Lower surface pH aggressively and can cause tingling-to-burning when current is applied to a chemically exfoliated surface
Facial oils and oil-based serums: Create an insulating layer that blocks current penetration, regardless of how thin the application
Strong vitamin C in L-Ascorbic Acid form at 15%+ concentration: At high concentrations, can interact with the electrical current and cause localised oxidative stress on sensitised skin
The one exception: Pure aloe vera gel (INCI: Aloe Barbadensis Leaf Juice) is both skin-soothing and water-based, making it an acceptable pre-treatment application. Some users apply it as a priming layer under the conductive gel.
Step 3: Apply Conductive Gel Generously
This is the single most critical product in your entire microcurrent routine. The conductive gel serves as the electrical bridge between the device probe and your skin, and its water content is the active ingredient. Apply it in a mask-like layer — a 2–3mm coating across the treatment area, not a thin serum film. The gel must remain wet throughout the session; dry gel = broken circuit = zero muscle stimulus.
Look for conductive gels that list water (Aqua) as the first ingredient, contain no occlusive agents like dimethicone, and ideally include aloe vera or hyaluronic acid for comfort. Some premium microcurrent brands formulate dedicated conductive gels with trace minerals (potassium, sodium) that further improve ionic conductivity — these are worth the investment if your device manufacturer recommends them.
Conductive Medium
Conductivity Assessment
Device-brand conductive gel
Best — formulated for ionic transfer
Pure aloe vera gel (99%)
Excellent — natural, water-based
Water-based hyaluronic serum
Good — verify no silicones in INCI
Glycerin + water mix
Moderate — functional if gel unavailable
Facial oil
AVOID — blocks current completely
Silicone primer
AVOID — insulates, disrupts treatment
Phase 2 — During the Microcurrent Session: Technique and Mid-Session Care
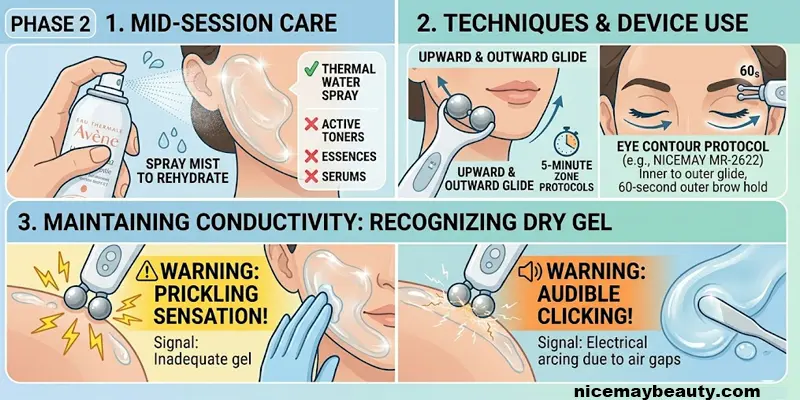
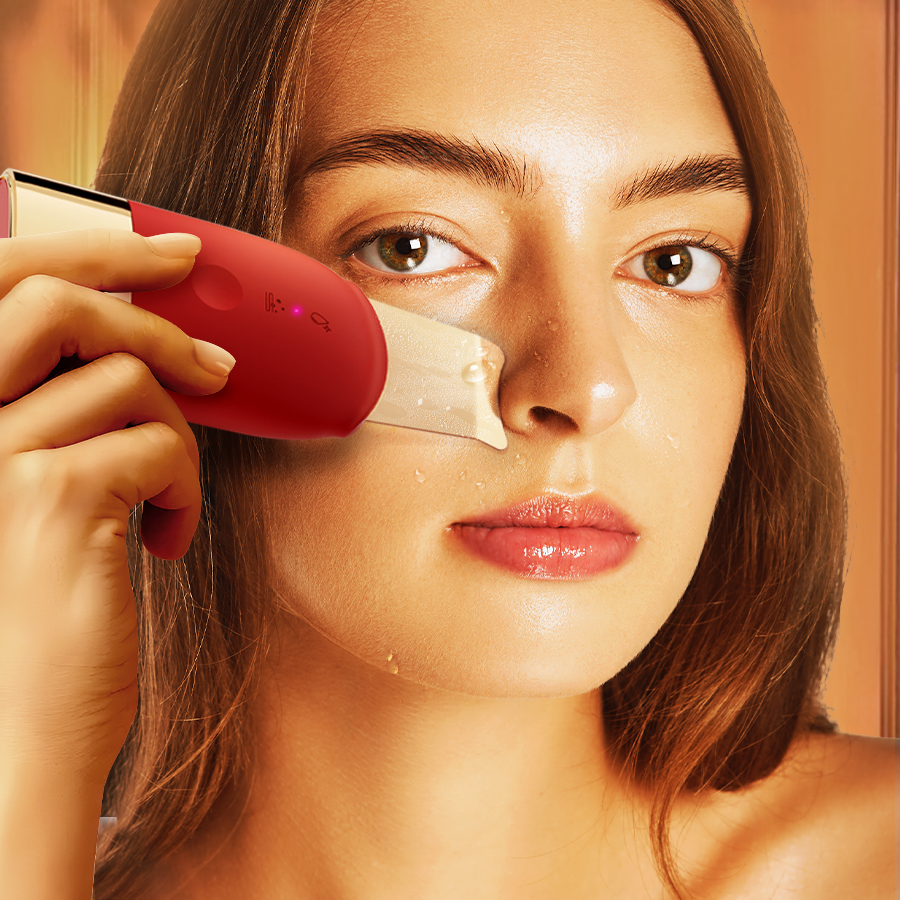
Once the conductive gel is applied, perform your device glides or holds according to the manufacturer protocol. For full-face devices, this typically means 5-minute protocols per zone (forehead, mid-face, jawline, neck) using upward and outward lifting motions. For targeted eye-area devices like the NICEMAY MR-2622, the protocol is more precise: gentle glides along the orbital bone, from inner to outer corner, with a 60-second hold at the outer brow to address drooping.
Maintaining Conductivity Mid-Session
The most common in-session error is allowing the conductive gel to dry out. Depending on your ambient humidity, gel can partially dry within 8–10 minutes. Watch for two warning signs: a mild tingling or prickling sensation at the probe tip (signal of inadequate gel at the skin-probe interface), or an audible clicking sound from the device (indicating electrical arcing due to air gaps).
Mid-session, simply apply additional gel with clean fingertips or mist the treatment area with a plain thermal water spray (Avene, La Roche-Posay) to rehydrate without introducing any active ingredients. Do not apply toner, essence, or serum mid-session — the goal is conductivity maintenance, not actives delivery.
Eye Contour Protocol: A Special Case
The eye contour deserves its own section because the skin here is 0.5mm thick — approximately four times thinner than skin on the cheeks — and has virtually no subcutaneous fat as a buffer. Devices designed specifically for this zone, such as the NICEMAY MR-2622 Micro-Current Lifting Device for the Eyes, operate at a calibrated current intensity appropriate for this sensitive zone, which a full-face device probe applied near the orbital rim may not provide. Using an eye-specific microcurrent device ensures the right µA output for orbicularis oculi stimulation without the risk of over-stimulating the delicate periorbital tissue.
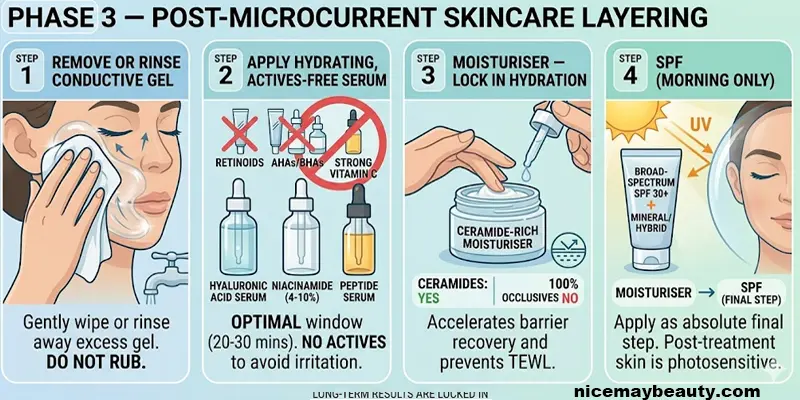
Phase 3 — How to Layer Skincare After a Microcurrent Device Session?
Post-treatment layering is where the majority of your long-term results are locked in — or lost. Microcurrent temporarily increases skin permeability through a process called electroporation-adjacent cellular opening, making the 20–30 minutes after your session the optimal window for ingredient absorption. Use this window strategically.
Step 1: Remove or Rinse the Conductive Gel
If your conductive gel doubles as a hydrating mask (many brands formulate theirs this way), you can leave a thin residual layer. For standard gels, gently wipe away the excess with a damp microfibre cloth using light, upward strokes — do not rub. The goal is to clear the surface for your actives-free serums without disrupting the skin barrier you have just worked to support.
Step 2: Apply a Hydrating, Actives-Free Serum
This is your absorption window, and the most important rule is: no actives. The post-treatment skin is more permeable, which means active ingredients penetrate deeper and faster — including any irritants. Introduce the following in lightweight-to-heavier order:
Hyaluronic acid serum (0.1–2% concentration range): Draws water into the upper dermis; multi-molecular-weight formulas penetrate at different skin depths for comprehensive hydration
Peptide serum: Signal peptides (e.g., acetyl hexapeptide-3, palmitoyl tripeptide-1) complement the muscle-stimulating effects of microcurrent by independently supporting collagen synthesis
For a detailed breakdown of where Vitamin C specifically fits into the post-microcurrent sequence — including timing recommendations and form-specific guidelines — see Should You Use Vitamin C Serum Before or After Microcurrent? for the full guide.
Step 3: Moisturiser — Lock In Hydration
Apply your everyday moisturiser as the third layer. Choose a formulation that contains ceramides (ceramide NP, ceramide AP, ceramide EOP), which actively repair the skin barrier. Post-microcurrent skin has been electrically stimulated, and a ceramide-rich moisturiser accelerates barrier recovery and prevents trans-epidermal water loss (TEWL) from the temporarily more permeable skin surface. A product weight of 20–40% occlusives-to-humectants ratio is ideal; avoid 100% occlusive balms like pure petrolatum at this stage.
Step 4: SPF (Morning Sessions Only)
For morning microcurrent users, always finish with a broad-spectrum SPF 30 or higher mineral or hybrid sunscreen. Post-treatment skin is more photosensitive, and UV exposure on permeable skin can accelerate pigmentation and counteract the anti-aging work of your session. Apply SPF as the absolute final step — after moisturiser, never before. Silicone-based SPF formulas are fine at this stage because you are no longer using the device.
Post-Microcurrent Layer
Key Ingredients / Notes
1. Rinse/remove gel
Damp cloth, upward light strokes only
2. Hydrating serum
HA (0.1-2%), niacinamide (4-10%), peptides
3. Moisturiser
Ceramide-rich, 20-40% occlusives ratio
4. SPF (AM only)
Broad-spectrum SPF 30+, applied last
5. Wait 24 hrs for intense actives
No chemical peels, microinfusions, aggressive acids
Complete Skincare Layering Timeline: Before and After Microcurrent
The following protocol consolidates the full session into a single actionable sequence. Use this as your checklist every time you reach for the device.
Double cleanse if wearing makeup/sunscreen (oil-free micellar first, then gel cleanser)
Water-based toner — no glycolic, no lactic acid
Apply conductive gel
Perform microcurrent session
Remove gel with damp cloth
Hyaluronic acid serum
Peptide serum
Ceramide-rich moisturiser or barrier repair cream
(Retinol/acids go here — BUT only on non-device nights, not the same evening)
What to Avoid — Ingredient Conflicts That Ruin Results
Understanding what not to do is as important as the protocol itself. The most damaging mistakes happen when users treat microcurrent as just another step in their existing routine rather than the core treatment that reorganises the entire routine around it.
Before the Device: The Three Blockers
Facial oils and oil-based serums: Oleic, linoleic, and palmitic acids in facial oils create a lipid barrier with measurably higher electrical impedance. Even 2–3 drops of rosehip oil will significantly weaken current delivery to the muscle layer.
Retinoids the same evening: Retinol and its derivatives speed up cell turnover and make the epidermal barrier temporarily thinner and more reactive. Using microcurrent on retinized skin increases the risk of inflammation, capillary irritation, and the sensation of burning at the probe tip.
Strong exfoliating acids: AHAs and BHAs physically remove the stratum corneum when used at pH below 3.5. Applying microcurrent to a freshly exfoliated surface means electrical current passing through a compromised barrier — unpredictable penetration depth, heightened sensitivity, and potential for post-inflammatory hyperpigmentation in darker skin tones.
After the Device: The Sensitisation Window
The 24-hour post-treatment window requires restraint. Microcurrent does not cause visible redness like RF or laser, but it does leave the skin in a heightened state of permeability and mild electrical micro-stress. Within this window, avoid:
Chemical peels (any concentration of glycolic, salicylic, or mandelic acid)
Micro-needling or microinfusion treatments
Aggressive physical scrubs or cleansing brushes on high speed
Prolonged direct sun exposure without SPF
Spotlight: NICEMAY MR-2622 for the Eye Contour — Integrated Protocol
The NICEMAY MR-2622 Micro-Current Lifting Device for the Eyes is purpose-engineered for the periorbital zone — the area around the eyes where most users first notice loss of firmness, fine lines (crow’s feet), and upper lid heaviness. What separates a dedicated eye microcurrent device from using a full-face device near the eyes is the delivery mechanism: the probe shape and current intensity are calibrated specifically for the thinner, more sensitive skin around the orbital bone.
How to Integrate the MR-2622 Into Your Layering Routine
The NICEMAY MR-2622 fits into the protocol during Phase 2 (the treatment window), typically as the final zone treated in a session or as a standalone eye treatment on days when a full-face session is not scheduled. Here is the eye-specific integration:
Cleanse and remove all eye makeup thoroughly, including waterproof mascara residue
Apply a thin layer of water-based conductive gel or pure aloe vera under the eye and to the orbital area — avoid getting product directly on the lash line or into the eye itself
Use the MR-2622 according to its protocol: slow, controlled glides from the inner corner outward along the under-eye trough; follow with gentle lifts at the outer brow and upper lid area
Post-treatment, apply a targeted peptide eye serum (look for acetyl tetrapeptide-5 or caffeine for the under-eye zone) — the post-microcurrent absorption window significantly enhances delivery of these ingredients
Finish with a light eye cream containing ceramides and vitamin E — no retinol eye cream the same evening
The benefit of a dedicated eye device is precision. The full-face device, applied near the orbital rim, may deliver more current than the delicate periorbital skin requires for effective stimulation, increasing the risk of minor capillary sensitivity. The MR-2622 removes that guesswork.
Frequency, Skin Types, and Adjusting the Protocol
How Often Should You Use a Microcurrent Device?
The general professional consensus is:
Initial phase (weeks 1–4): 5 sessions per week, 15–20 minutes per session — this mimics the intensive phase of professional treatments
Maintenance phase (week 5+): 2–3 sessions per week is sufficient to maintain neuromuscular re-education of the facial muscles
Overuse is a real risk with microcurrent — unlike LED, which is broadly safe at high frequencies, daily microcurrent at maximum intensity may lead to muscle fatigue rather than toning. Think of it as resistance training for the face: recovery days are part of the programme.
Adjusting for Sensitive Skin
If you have rosacea, reactive skin, or are undergoing active dermatological treatment, consult your dermatologist before beginning a microcurrent protocol. Individuals with metal implants in the face or a pacemaker should not use microcurrent devices at all — this is a clinical contraindication, not a precaution. For reactive skin, start at the lowest intensity setting, use only pure aloe vera as the conductive medium for the first 2 weeks, and limit sessions to every other day.
Key Technology Comparison at a Glance
Microcurrent → Best for: Gradual muscle re-education, cumulative lift over time. Feels like: nothing or mild tingling.
Radiofrequency (RF) → Best for: True skin laxity, dermal thinning, deep collagen rebuilding. Feels like: gentle warmth.
EMS → Best for: Muscle reconditioning, sharper angular definition, double chin. Feels like: gentle tapping or mild contractions.
FAQs About How to Layer Skincare Products Before and After Using a Microcurrent Device
Can I use hyaluronic acid serum as the conductive gel during my microcurrent session?
A water-based hyaluronic acid serum can work as a conductive medium in a pinch, but check the INCI list carefully first. If the formula contains silicones (dimethicone, cyclopentasiloxane) or occlusive emollients, it will reduce rather than enhance conductivity. The ideal HA-based serum for this use is one where water is the first ingredient and no lipid-based emollients appear in the first ten INCI entries. That said, a dedicated conductive gel is always the recommended choice because it is formulated specifically for optimal ionic transfer.
How long after a microcurrent session should I wait before applying retinol?
Wait at least 24 hours before applying retinol, retinal, or tretinoin after a microcurrent session. The post-treatment permeability window and mild electrical micro-stress mean that a retinoid applied within this window penetrates more aggressively and unevenly, significantly increasing the risk of peeling, sensitivity, and barrier disruption. If you use retinol regularly, the safest protocol is: microcurrent on Monday, Wednesday, Friday — retinol on Tuesday, Thursday, Saturday.
Can I use my microcurrent device every day?
During the first four weeks (the intensive loading phase), daily sessions of 15–20 minutes are appropriate and clinically analogous to what professional facialists perform in-clinic over a treatment series. After week four, reduce to a maintenance frequency of 2–3 sessions per week. Daily use beyond the intensive phase can lead to facial muscle fatigue — paradoxically producing less definition rather than more, similar to overtraining in physical exercise. Always follow your specific device manufacturer’s protocol as current intensities vary between models.
Is it safe to use the microcurrent device around the eyes?
Using a device designed and calibrated for the periorbital zone, such as the NICEMAY MR-2622, is safe when used according to the instructions. The key precautions are: never apply the device directly over the eyeball, avoid open wounds or active breakouts around the eye area, and use an eye-specific conductive gel rather than a thick full-face gel that risks product migration into the eyes. People with metal eye implants (e.g., certain cosmetic eyelid procedures) should consult their surgeon before use.
Why does my skin feel tingly during the microcurrent session?
A mild tingle during a microcurrent session is normal and simply indicates that electrical current is being delivered to the skin. However, a sharp or stinging sensation is a warning sign that one of three things has occurred: (1) the conductive gel has dried out and the probe is making direct skin contact without sufficient conductivity medium — reapply gel immediately; (2) you have applied an active ingredient (acid, retinoid) that is interacting with the current; or (3) the device intensity is set too high for your current skin sensitivity. Reduce intensity, reapply gel, and if stinging persists, end the session and reassess your pre-treatment product routine.